


Abstract
This article provides a comprehensive examination of the procedure for adjusting pressure reducing valves (PRVs) within fire protection systems. It posits that the correct calibration of these valves is not merely a technical task but a fundamental requirement for the operational integrity and reliability of the entire life-safety system. The analysis delves into the underlying hydraulic principles governing water pressure, including the critical distinctions between static and residual pressures. A detailed, five-step methodology for adjustment is presented, encompassing pre-adjustment safety protocols, static pressure setting, dynamic flow testing, system restoration, and long-term maintenance strategies. The discourse extends to differentiate between various types of PRVs, such as direct-acting and pilot-operated models, and explores their specific applications. By contextualizing the adjustment process within the broader framework of system design specifications and regulatory compliance, the article argues for a holistic approach that combines technical precision with a deep understanding of the system's purpose. It serves as an essential guide for facility managers, fire safety professionals, and engineering technicians responsible for maintaining these vital components.
Key Takeaways
- Always isolate the system and follow lockout/tagout procedures before starting any work.
- Use two calibrated pressure gauges to accurately measure upstream and downstream pressures.
- Adjust static pressure first with no flow, making small, incremental turns to the adjusting bolt.
- Learning how to adjust pressure reducing valve settings requires verifying with a flow test.
- Document all initial and final pressure readings in the system logbook for compliance.
- Address pressure creep immediately as it indicates a potential internal valve failure.
- Regularly inspect and test valves according to NFPA 25 and local authority standards.
Table of Contents
- Understanding the Core Principles: Why Pressure Management is Non-Negotiable in Fire Safety
- Step 1: Pre-Adjustment Preparation and Safety Protocols
- Step 2: Executing the Static Pressure Adjustment
- Step 3: Performing and Verifying the Residual Pressure (Flow) Test
- Step 4: Finalization, Documentation, and System Restoration
- Step 5: Long-Term Maintenance and Troubleshooting Common Issues
- Advanced Considerations for Pressure Regulation
- Frequently Asked Questions (FAQ)
- Conclusion
- References
Understanding the Core Principles: Why Pressure Management is Non-Negotiable in Fire Safety
Before one can approach the mechanical task of turning a wrench on a valve, it is of paramount importance to cultivate a deeper appreciation for the forces at play. Water, the lifeblood of a fire suppression system, is a powerful yet indifferent element. Its behavior is governed by the unyielding laws of physics, and our ability to harness it effectively in an emergency depends entirely on our capacity to manage one of its most fundamental properties: pressure. To think of a fire protection system as merely a network of pipes is to miss the point; it is, in fact, a carefully balanced hydraulic ecosystem, and the pressure reducing valve stands as its most critical regulator.
The Physics of Water Pressure in Fire Suppression
Imagine you are watering your garden with a hose. If you open the spigot just a little, a gentle stream arcs out, insufficient to reach the far corners of your garden bed. If you open it fully, the water jets out with force, potentially flattening delicate plants. This simple analogy captures the essence of pressure management in a far more complex fire protection system. Pressure, typically measured in Pounds per Square Inch (PSI) or Bars, is the force that propels water through the pipes to the sprinkler heads or hose connections.
However, not all pressure is created equal. An excessive amount of force can be just as detrimental as an insufficient amount. Very high pressure can cause catastrophic failure of pipe fittings, which are rated for specific pressure limits, often up to 300 PSI in many fire systems (dbaovalve.com). It can lead to violent blowouts at sprinkler heads, damage components, and create a "fog" of water that is too fine to effectively absorb heat and suppress the fire. Conversely, low pressure results in weak discharge from sprinklers, failing to provide adequate coverage and allowing a fire to grow unchecked. The goal is not maximum pressure, but optimal pressure, as defined by the system's hydraulic calculations—a precise figure that ensures each sprinkler head will discharge the correct density of water over its designated area.
The Role of the Pressure Reducing Valve (PRV): The System's Guardian
Herein lies the essential function of the pressure reducing valve. It acts as a vigilant guardian, automatically throttling down a high, fluctuating inlet pressure from a municipal supply or a powerful fire pump to a lower, constant, and predictable outlet pressure. This is particularly vital in high-rise buildings, where the pressure required to push water to the top floors would be dangerously excessive for the lower floors without intervention (leyonpipingsystem.com).
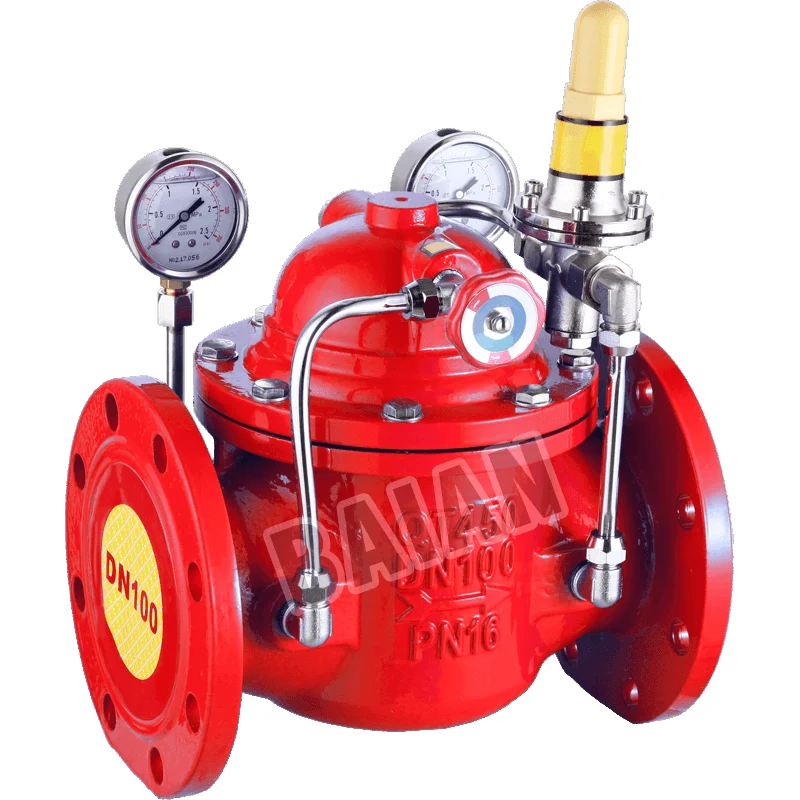
A PRV does not operate like a simple gate or ball valve that is either open or closed. Instead, it modulates. Inside the valve body, a diaphragm or piston is acted upon by two opposing forces: the downstream water pressure on one side, and the force of a calibrated spring on the other. You set the desired pressure by compressing or decompressing this spring with an adjusting bolt. When downstream pressure rises above this set point, it pushes the diaphragm, causing the valve to close slightly and restrict flow. When downstream pressure drops, the spring force overcomes the water pressure, opening the valve to allow more flow. It is a dynamic, self-regulating mechanism, a silent sentinel ensuring the system remains within its safe and effective operating parameters. Without it, the delicate balance of the entire fire protection network would be lost.
Types of Pressure Reducing Valves in Fire Protection
The world of PRVs is not monolithic; different designs exist to meet varying operational demands. The two primary categories one will encounter in fire protection are direct-acting and pilot-operated valves. Understanding their differences is key to appreciating why one might be chosen over another and how their adjustment might feel different.
A direct-acting PRV is the simpler of the two. The main spring directly opposes the downstream pressure acting on a diaphragm to control the valve's opening. They are robust and reliable for many applications. However, they can be less sensitive to small pressure changes and may exhibit more "droop"—a decrease in outlet pressure as flow increases.
A pilot-operated PRV, by contrast, is a more sophisticated device. It uses a small, highly sensitive pilot valve to control the main valve. The line pressure is used to power the main valve's operation, with the pilot acting as the "brain." This design allows for much tighter and more stable pressure control, even with large variations in flow or inlet pressure. They can maintain a set pressure with remarkable accuracy, which is why they are often specified for critical applications where precise pressure is non-negotiable (cncontrolvalve.com).
| Feature | Direct-Acting PRV | Pilot-Operated PRV |
|---|---|---|
| Mechanism | A single spring directly controls the main valve. | A small pilot valve controls the main valve using line pressure. |
| Pressure Control | Good, but can exhibit pressure droop under high flow. | Excellent, very stable outlet pressure across a wide flow range. |
| Sensitivity | Less sensitive to minor pressure fluctuations. | Highly sensitive and responsive to system changes. |
| Complexity | Simpler design, fewer internal parts. | More complex, with small internal passages and a pilot mechanism. |
| Application | Common in smaller systems or where precision is less critical. | Preferred for high-rises, standpipes, and critical systems. |
| Maintenance | Generally simpler to maintain and troubleshoot. | Requires more specialized knowledge for service and repair. |
Static vs. Residual Pressure: A Critical Distinction
Finally, one cannot begin the process of how to adjust a pressure reducing valve without a firm grasp of two foundational concepts: static pressure and residual pressure. The failure to distinguish between them is a common source of error.
Static pressure is the pressure in the system when no water is flowing. It is the potential energy stored within the pipes, ready for action. This is the pressure you would read on a gauge if you simply connected it to a fire hydrant without opening it.
Residual pressure is the pressure that remains in the system while water is flowing. When a sprinkler head opens or a firefighter opens a hose valve, the movement of water causes friction against the pipe walls, resulting in a pressure drop. The pressure measured during this flow condition is the residual pressure.
A fire protection system is designed to deliver a specific residual pressure at the most remote sprinkler head to ensure it functions correctly. The PRV must be set to provide a static pressure that is high enough to overcome the friction loss and still deliver the required residual pressure during a fire event. This is why a simple static adjustment is insufficient; it must be verified with a flow test.
| Parameter | Static Pressure | Residual Pressure |
|---|---|---|
| Condition | Measured when water is not moving (no flow). | Measured when water is actively flowing through the system. |
| Represents | The potential energy or baseline pressure of the system at rest. | The available working pressure during an operational event. |
| How to Measure | Read a gauge connected to the system with all outlets closed. | Read a gauge while flowing water from a test drain or hydrant. |
| Value | Always higher than the residual pressure at the same point. | Always lower than the static pressure due to friction loss. |
| Importance | Determines the starting pressure before a fire; too high can damage pipes. | Determines the effectiveness of sprinklers/hoses during a fire. |
Understanding this interplay is not academic; it is the very heart of the adjustment process. You will first set the static pressure, and then you will test to ensure the residual pressure is adequate. They are two sides of the same coin, and both must be correct for the system to be considered reliable.
Step 1: Pre-Adjustment Preparation and Safety Protocols
Approaching a pressurized fire protection system without the proper preparation is akin to navigating a minefield blindfolded. The energy contained within those pipes is immense, and safety is not merely a suggestion—it is an absolute prerequisite. This initial phase of preparation is the most important step in the entire process. Rushing here can lead to equipment damage, flooding, or serious personal injury. A methodical and disciplined approach is the hallmark of a true professional.
Assembling Your Toolkit: The Right Instruments for the Job
Before you even touch the valve, you must gather your tools. Working on a PRV is not a task for improvisation. Each tool has a specific purpose, and the absence of the right one can compromise both safety and accuracy. Your essential toolkit should include:
- Two Calibrated Pressure Gauges: This is non-negotiable. "Calibrated" is the key word. Using unverified, old gauges is a recipe for an incorrect setting. You need two: one for the upstream (inlet) side of the PRV and one for the downstream (outlet) side. The gauges should have a pressure range appropriate for the system—typically 0-300 PSI (or 0-20 Bar). The dual-gauge setup allows you to see the pressure drop across the valve in real-time.
- Appropriate Wrenches: You will need a wrench (often an adjustable or pipe wrench) to loosen the large locknut on the adjustment stem, and another, smaller wrench for the adjusting bolt itself. Ensure they fit snugly to avoid stripping the nut or bolt head.
- Personal Protective Equipment (PPE): At a minimum, this includes safety glasses to protect your eyes from any unexpected spray and gloves to protect your hands. Depending on the location, steel-toed boots may also be advisable.
- Lockout/Tagout (LOTO) Kit: This is a critical safety component. The kit should contain a padlock and a "Do Not Operate" tag. This is used to secure the main control valve in the closed position, physically preventing anyone from accidentally re-pressurizing the system while you are working on it.
- System Drawings/Schematics: These are your map. They will show you the location of the PRV, the main control valves, test drains, and, most importantly, the design pressures you are aiming for. Never work from memory alone.
System Isolation and Notification: The First Commandment of Safety
With your tools assembled, the next sequence of actions is dedicated to safely isolating the portion of the system you intend to work on.
- Notification: This is the first and most crucial action. You must notify the building owner or their designated representative. If the system is monitored, you must contact the alarm monitoring company and the local fire department to inform them that the system (or a part of it) will be temporarily out of service. This prevents a false alarm and an unnecessary emergency response when a tamper switch on a control valve is activated.
- Locate the Control Valve: Using your system drawings, identify the main shut-off valve that controls the water supply to the PRV you are adjusting. This is often a post indicator valve (PIV) or an outside screw and yoke (OS&Y) valve.
- Close the Valve: Slowly close the control valve completely. Closing it slowly helps prevent water hammer, a destructive pressure surge that can damage pipes and fittings.
- Apply Lockout/Tagout: Once the valve is fully closed, apply your padlock and tag. The tag should clearly state that the system is being serviced and should not be operated. This is your primary safeguard.
- Relieve System Pressure: Even with the main valve closed, the pipes downstream will still be holding pressure. Locate a drain or inspector's test connection downstream of the PRV and slowly open it to bleed off all the trapped pressure. You will know the pressure is gone when the water flow stops and the gauge reads zero. Only then is it safe to proceed.
Reading the System's Blueprint: Interpreting Schematics and Design Specifications
Your system drawings are more than just a picture; they are a set of instructions from the engineer who designed the system. Before you make any adjustment, you must consult these documents to understand the intended pressures. Somewhere in the hydraulic calculation summary or on the drawings themselves, you will find the required settings for the PRV. This information is vital. It will typically specify both the required static outlet pressure and the required residual outlet pressure at a certain flow rate (e.g., 500 GPM).
Your job is not to invent a pressure setting you think is best; your job is to calibrate the valve to meet the engineer's design criteria. These criteria are based on complex calculations that ensure every part of the system works in harmony. Ignoring the design specifications is a profound error that can render the entire fire protection system ineffective. If you cannot locate these documents, you must halt the process until they can be obtained. Guesswork has no place in life safety.
Initial Pressure Readings: Establishing a Baseline
With the system safely isolated and drained, you can now install your calibrated gauges. Most PRVs will have threaded ports, or "gauge ports," on the inlet and outlet sides specifically for this purpose.
- Remove the small plugs from the gauge ports. You may need a small wrench or Allen key for this.
- Carefully thread your gauges into the ports. Use a small amount of pipe sealant or Teflon tape to ensure a leak-free seal, but be careful not to obstruct the gauge orifice.
- Once the gauges are installed, it is time to re-pressurize the system slowly to get a baseline reading. First, ensure the downstream drain valve is closed. Then, have a second person (if possible) very slowly open the main control valve while you watch the gauges.
- As the valve opens, water will fill the system. Watch the upstream gauge rise to match the incoming supply pressure. The downstream gauge will also rise, but should stop at the PRV's current set pressure.
- Record these initial static pressure readings. For example, you might see "Inlet: 150 PSI, Outlet: 90 PSI." Comparing this initial outlet reading to the required static pressure from the design documents tells you if an adjustment is needed and in which direction. This baseline measurement provides the starting point for the entire adjustment process.
Step 2: Executing the Static Pressure Adjustment
Having completed the crucial preparatory steps, you are now ready to engage with the valve itself. This is the moment where theory meets practice. The adjustment of the static pressure—the system's baseline pressure when no water is flowing—is a task that demands a delicate touch and a patient mind. The goal is to align the valve's performance with the engineered design specifications you identified earlier. This process is methodical and should never be rushed.
Locating the Adjustment Mechanism
First, you must identify the part of the valve that allows for adjustment. On nearly all pressure reducing valves, this consists of two key components located on the top of the valve bonnet or pilot assembly:
- The Adjusting Bolt (or Stem): This is the component you will turn to change the pressure setting. It is usually a threaded bolt or a stem with a square or hexagonal head. Turning this bolt directly increases or decreases the compression on the internal spring that governs the pressure setting.
- The Locknut: This is a larger nut threaded onto the adjusting bolt, tightened down against the valve's housing. Its sole purpose is to prevent the adjusting bolt from vibrating or moving out of position over time, thereby "locking in" your setting.
Before you can make any changes, you must first loosen this locknut. You will need a wrench that fits it properly to get adequate leverage without damaging the nut.
The Art of the Turn: Making Incremental Changes
With the locknut loosened, you can now turn the adjusting bolt. Here lies the core of the adjustment process, and it is governed by a universal principle for most PRVs:
- To Increase Pressure: Turn the adjusting bolt clockwise (as if you were tightening it). This action compresses the spring inside the valve, which means it requires more downstream water pressure to overcome the spring force and close the valve. The result is a higher regulated outlet pressure.
- To Decrease Pressure: Turn the adjusting bolt counter-clockwise (as if you were loosening it). This action relaxes the spring, requiring less downstream pressure to close the valve. The result is a lower regulated outlet pressure.
The most common mistake at this stage is making large, sweeping adjustments. This can cause the pressure to overshoot the target dramatically and lead to a frustrating cycle of overcorrection. The professional approach is one of incrementalism. Think in terms of quarter-turns or even eighth-turns. Make a small adjustment, then pause.
Observing the Downstream Gauge: The Feedback Loop
This is where your dual-gauge setup proves its worth. After each small turn of the adjusting bolt, you must direct your full attention to the downstream pressure gauge. It is your only source of feedback.
- Make a small adjustment: Turn the bolt a quarter-turn clockwise to increase pressure.
- Pause and Observe: Watch the needle on the downstream gauge. It should rise slightly. It may take a few seconds for the pressure to stabilize as the internal components of the valve shift to their new equilibrium. Do not make another adjustment until the needle has stopped moving.
- Compare to Target: Check the reading against your target static pressure from the design specifications. Are you close? Do you need more, or have you gone too far?
- Repeat as Needed: Continue this cycle of small adjustments and patient observation until the downstream gauge needle rests precisely on your target pressure. If you are trying to reach 100 PSI, and your gauge reads 98 PSI, you may only need a very slight nudge on the bolt. If you overshoot and the gauge reads 102 PSI, make a small counter-clockwise turn and observe again.
This iterative process is a dialogue between you and the valve. You give it an input (a turn of the bolt), and it gives you feedback (a change in pressure). Your role is to listen carefully to that feedback and respond with precision.
Setting and Securing the Static Pressure
Once your downstream gauge is holding steady at the exact static pressure required by the system's design, your adjustment is complete. However, the job is not finished until that setting is secured.
- Hold the Adjusting Bolt: Using the appropriate wrench, hold the adjusting bolt perfectly still. It is critical that it does not turn while you perform the next step.
- Tighten the Locknut: While holding the adjusting bolt, use your other wrench to tighten the locknut down firmly against the valve body. This action locks the adjusting bolt in place, preventing it from moving. Tighten it to be snug and secure, but avoid excessive force that could damage the threads or the valve housing.
- Final Verification: After tightening the locknut, give the downstream gauge one last look. The act of tightening the locknut can sometimes cause a very slight shift in the adjusting bolt's position. Verify that the pressure is still exactly where you set it. If it has moved slightly, you may need to loosen the locknut and make a final, minuscule correction.
At this point, you have successfully completed the static pressure adjustment. The valve is now set to deliver the correct baseline pressure into the system. However, this is only half the battle. The valve's performance under flow conditions is yet to be tested, which is the crucial next phase of the process.
Step 3: Performing and Verifying the Residual Pressure (Flow) Test
Setting the static pressure is like tuning a race car's engine while it sits in the garage. It is an essential first step, but it tells you nothing about how the car will perform on the track. Similarly, a pressure reducing valve must be tested under dynamic, real-world conditions to ensure it functions correctly when called upon in a fire. This is the purpose of the flow test: to verify that the valve can deliver the required residual pressure while water is moving through it, simulating the activation of sprinkler heads. This step separates a mere adjustment from a comprehensive and professional calibration.
Simulating a Fire Event: Opening a Test Connection
To perform a flow test, you need to create a controlled flow of water downstream of the PRV. Fire protection systems are built with specific connections for this very purpose. You will typically use one of the following:
- Inspector's Test Connection: This is a valve, often located at the most remote point of a sprinkler zone, that has an orifice equivalent in size to a single sprinkler head. Opening it simulates the activation of one sprinkler.
- Drain Valve: Larger drain valves, often 2 inches in diameter, are located at low points in the system or near the main risers. Opening one of these can simulate a larger flow, equivalent to several sprinklers activating.
- Hose Connection: In some cases, a fire hose connection in a stairwell or on the floor can be used, with a hose directed to a safe drainage area.
The goal is to flow a volume of water that is specified in the system's design criteria or by standards like NFPA 25. This may be the flow of a single sprinkler or a larger flow of 250 or 500 Gallons Per Minute (GPM). Before opening any valve, ensure you have a safe place for the water to discharge, such as a large floor drain or an exterior area where it will not cause damage or create a hazard.
Monitoring Pressure Under Flow Conditions
This is a two-person job for optimal safety and accuracy. One person will operate the test valve, while the other remains at the PRV to monitor the gauges. The sequence is as follows:
- Establish Communication: Ensure both technicians can communicate clearly, either through radios or line of sight.
- Open the Test Valve: The first technician should slowly and fully open the designated test valve. As water begins to flow, you will hear it rushing through the pipes.
- Observe the Gauges: The technician at the PRV should now watch both gauges intently. The upstream (inlet) gauge may drop slightly due to the demand on the supply. The downstream (outlet) gauge will drop significantly. This new, lower reading on the downstream gauge is the residual pressure.
For example, your static pressure might have been set to 125 PSI. During the flow test, the downstream gauge might drop to 95 PSI. This 95 PSI is your residual pressure under that specific flow condition.
Comparing Against Design Specifications
With the water still flowing, you must now compare your observed residual pressure to the requirements laid out in the system's hydraulic calculations. The engineering documents will state something like, "The PRV shall maintain a minimum of 95 PSI at the outlet with a flow of 500 GPM."
- If your reading matches or is slightly above the requirement: Your adjustment is successful. The PRV is performing as designed. For example, if the requirement is 95 PSI and your gauge reads 98 PSI, that is excellent. A small margin of safety is often desirable.
- If your reading is below the requirement: The valve is not providing enough pressure under flow conditions. For instance, if the requirement is 95 PSI and your gauge reads only 85 PSI, the sprinklers downstream may not operate effectively. This indicates that your initial static pressure setting was too low.
- If your reading is significantly above the requirement: While less common, this could indicate that the valve is not regulating properly or that the static setting was too high, potentially putting unnecessary strain on downstream components.
Iterative Adjustments: Fine-Tuning for Optimal Performance
If the residual pressure is not within the specified range, you must engage in a fine-tuning process. This is the most nuanced part of how to adjust a pressure reducing valve.
- Close the Test Valve: Signal the other technician to close the test valve. The flow will stop, and you should see the downstream pressure return to your previously set static pressure.
- Make a Corrective Adjustment:
- If your residual pressure was too low, you need to slightly increase the static pressure. Loosen the locknut and give the adjusting bolt a small clockwise turn (e.g., a quarter-turn). This will raise the static pressure baseline.
- If your residual pressure was too high, you need to decrease the static pressure with a small counter-clockwise turn.
- Retighten the Locknut and Re-test: Secure the locknut and repeat the entire flow test. Have the test valve opened again and observe the new residual pressure.
- Repeat Until Correct: You may need to repeat this cycle of adjusting the static pressure and then performing a flow test two or three times to "walk" the valve into the perfect performance window. Each adjustment to the static pressure will influence the resulting residual pressure. It is a balancing act that requires patience.
Once you have achieved a residual pressure reading that meets the design criteria during a full flow test, and the static pressure returns to an acceptable level when the flow stops, the calibration is complete. You have now verified the valve's performance under both static and dynamic conditions.
Step 4: Finalization, Documentation, and System Restoration
The mechanical adjustments are complete and the valve is performing to specification. However, the task is far from over. This final phase is about ensuring the system is left in a safe, operational, and well-documented state. Skipping these concluding steps would be a gross oversight, undermining the professionalism of the work performed and potentially creating future compliance issues. This is the phase of diligence and responsibility.
Closing Test Drains and Verifying No Leaks
The first order of business is to return the system to its sealed, standby state.
- Confirm All Drains are Closed: Double-check that the inspector's test connection or any drain valves that were opened during the flow test are now fully and securely closed. A partially open drain can lead to a slow leak, causing water damage and potentially impairing the system by creating a constant pressure drop.
- Conduct a Visual Inspection: With the system fully pressurized, perform a thorough visual inspection of the pressure reducing valve and all associated fittings you have worked on. Look closely at the gauge ports where you installed your gauges and at the bonnet gasket of the PRV. Check for any drips, seeps, or sprays of water. Even a minor leak is unacceptable in a fire protection system and must be addressed immediately. This might involve tightening a fitting or replacing a gasket.
The Importance of Meticulous Record-Keeping
This step is arguably as important as the adjustment itself. Proper documentation is the cornerstone of effective fire protection system management and is a requirement under standards like NFPA 25, Standard for the Inspection, Testing, and Maintenance of Water-Based Fire Protection Systems.
You must record the details of your work in two places: on a tag attached directly to the valve and in the system's official logbook. The information should include:
- Date and Time of Service: The exact date the work was performed.
- Technician's Name: The name or initials of the qualified person who performed the adjustment.
- Initial Pressure Readings: The "as-found" upstream and downstream static pressures before any adjustments were made.
- Final Pressure Readings: The "as-left" upstream and downstream static pressures after adjustment.
- Flow Test Results: The measured residual pressure at the outlet and the flow rate at which it was measured (e.g., "98 PSI @ 500 GPM").
- Comments: Any other relevant observations, such as parts that were cleaned or replaced.
This record provides a clear history of the valve's performance. It is invaluable for future technicians, for the building owner, and for the Authority Having Jurisdiction (AHJ), such as a fire marshal, who may inspect the records to verify compliance. This documentation transforms your work from an isolated event into a part of the building's ongoing life safety narrative.
Restoring the System to Service
With the physical work done and documented, it is time to bring the entire system back online. This must be done as carefully as when it was taken offline.
- Remove Lockout/Tagout Devices: Remove your padlock and "Do Not Operate" tag from the main control valve. This action signifies that the work is complete and the valve can be operated.
- Slowly Reopen the Control Valve: This is a critical step. Never open the main control valve quickly. A sudden rush of high-pressure water into empty or partially empty pipes can cause a violent pressure surge known as water hammer, which has enough force to break fittings and damage equipment. The valve should be opened slowly, over the course of at least a minute or more for large systems, allowing the pipes to fill with water gradually and the air to be displaced.
- Verify Valve Position: If it is an OS&Y valve, ensure the stem is fully risen. If it is a PIV, ensure the indicator reads "OPEN."
- Clear System Alarms: As you opened the control valve, its tamper switch likely sent a supervisory signal to the fire alarm control panel. You must now ensure this signal is cleared and the panel shows the system is back in a normal, trouble-free state.
Communicating Completion
The final action is to close the communication loop you opened in Step 1. You must notify all relevant parties that the work is complete and the fire protection system is fully restored and operational. This includes:
- The building owner or facility manager.
- The alarm monitoring company.
- The local fire department or AHJ.
This final communication confirms that the building's primary defense against fire is back in service, concluding your professional responsibility for the task. Each of these final steps reinforces the integrity of the system and the professionalism of your service.
Step 5: Long-Term Maintenance and Troubleshooting Common Issues
A pressure reducing valve is not a "set it and forget it" device. It is a dynamic mechanical assembly with moving parts, seals, and springs that are under constant strain. Its initial, precise calibration can degrade over time due to wear, debris, and changes in water supply conditions. Therefore, understanding how to adjust a pressure reducing valve is only part of the equation; knowing how to maintain and troubleshoot it is essential for ensuring its long-term reliability. This proactive approach transforms maintenance from a reactive repair into a strategic management of the system's health.
Establishing a Routine Inspection Schedule
Preventative maintenance is the most effective way to ensure a PRV remains functional. The National Fire Protection Association (NFPA) provides clear guidelines in its NFPA 25 standard. A robust maintenance program should include:
- Quarterly Visual Inspection: Every three months, a qualified person should visually inspect the PRV. This involves checking for leaks from the valve body, bonnet, or fittings. It includes ensuring the valve is not externally damaged and that the upstream and downstream gauges are installed and appear to be in good condition.
- Annual Full Test: Once a year, the valve must be subjected to a full functional test. This involves conducting a complete flow test, just as you did during the initial setup (Step 3). You will measure the static and residual pressures and compare them against the system's design requirements and the results from the previous year's test. Any significant deviation warrants an immediate adjustment or further investigation.
This regular, scheduled testing is the only way to be certain that the valve will operate as intended when a fire occurs.
Troubleshooting "Pressure Creep": When the Valve Won't Hold
One of the most common and insidious PRV failures is "pressure creep." This occurs when, under no-flow (static) conditions, the downstream pressure slowly rises, or "creeps," past the set point. For example, you may have set the valve for 100 PSI, but hours later the gauge reads 120 PSI. This is a critical failure because it over-pressurizes the downstream piping and components, creating a risk of leakage or catastrophic failure.
Pressure creep is almost always caused by the valve not being able to close fully drip-tight. The common culprits are:
- Debris in the Valve Seat: A tiny piece of sediment, rust scale, or grit lodged between the valve's seat and disc can prevent a perfect seal. This allows a small amount of water to constantly leak through, slowly building up pressure downstream.
- Worn or Damaged Seat/Disc: Over time, the constant modulation of the valve and the abrasive nature of flowing water can erode or damage the soft seal (disc) or the metal seat it closes against.
- Failed Diaphragm or Piston Seal: A tear or perforation in the main diaphragm or a worn O-ring on a piston allows high-pressure water from the inlet side to leak into the control chamber or directly downstream, forcing the pressure up.
Addressing pressure creep usually requires isolating the valve, de-pressurizing it, and disassembling it to clean the internal components and inspect the seals. Often, replacing the soft parts (diaphragm, disc, O-rings) with a manufacturer's repair kit is the most effective solution.
Diagnosing Low or Fluctuating Pressure
Another common problem is an outlet pressure that is consistently low, or one that fluctuates erratically, even under steady flow conditions. The potential causes for this are varied:
- Clogged Upstream Strainer: Most PRV installations include a strainer on the inlet side to protect the valve from debris. If this strainer becomes clogged with sediment, it will restrict the flow of water to the PRV, starving it. The result is a low outlet pressure, not because the PRV is malfunctioning, but because it isn't receiving enough supply pressure to work with. Cleaning the strainer is the first troubleshooting step.
- Incorrectly Sized Valve: A PRV that is too small for the required flow rate will cause a very large pressure drop (excessive "droop"). A valve that is too large can "hunt" or fluctuate as it struggles to control a flow rate that is too low for its design. This is an engineering issue that may require replacing the valve with a correctly sized model.
- Pilot System Malfunction (for pilot-operated valves): The small internal passages of a pilot can become clogged with fine sediment, or the pilot's own diaphragm can fail. This will cause the main valve to behave erratically or fail to open sufficiently, leading to low pressure. Servicing a pilot system is a more delicate task that often requires specialized knowledge of the specific valve model.
When to Repair vs. When to Replace: A Cost-Benefit Analysis
When a PRV fails, the facility manager faces a choice: attempt a repair or replace the entire unit? The decision rests on a few key factors:
- Age of the Valve: Valves, like any mechanical equipment, have a finite service life. If a valve is over 15-20 years old, even if a repair is possible, it may be more cost-effective in the long run to replace it with a modern, more efficient unit.
- Cost and Availability of Repair Kits: For common valve models, repair kits containing all the necessary soft parts are readily available and affordable. If a repair kit can solve the problem (like pressure creep from a bad seal), a repair is often the best choice.
- Nature of the Failure: If the failure is due to worn soft parts, a repair is logical. However, if the main valve body is cracked, or if internal metal components like the stem or seat are severely eroded or damaged, a repair is often impractical or impossible. In such cases, replacement is the only safe option.
- System Upgrades: If the building's use has changed, leading to different pressure or flow requirements, it might be an opportune time to replace the old valve with a new one that is perfectly sized for the current needs. For critical infrastructure, investing in high-quality firefighting pressure regulating valves from a reputable supplier ensures better performance and a longer service life, justifying the initial investment.
Ultimately, the decision should prioritize safety and reliability. A temporary, cheap fix on a life-safety device is a dangerous gamble.
Advanced Considerations for Pressure Regulation
Mastering the basic adjustment and maintenance of a single pressure reducing valve is a significant achievement. However, in complex, large-scale fire protection systems, pressure regulation often involves more intricate configurations and considerations. Understanding these advanced concepts provides a more complete picture of how hydraulic balance is achieved across an entire building or industrial campus, revealing the systems-level thinking that underpins modern fire safety engineering.
PRVs in Series for High-Pressure Drops
In very tall high-rise buildings, the pressure supplied by fire pumps at the ground level can be extraordinarily high—perhaps 400 PSI or more—to ensure adequate pressure reaches the top floors. If a single PRV were asked to drop this pressure from 400 PSI down to 100 PSI for a lower floor, it would be subjected to immense stress. This large pressure differential can cause cavitation (the formation and collapse of vapor bubbles), which is extremely destructive to the valve's internal components, creating intense noise, vibration, and rapid erosion.
To solve this, engineers use two (or sometimes more) PRVs in series. This is known as two-stage pressure reduction.
- First Stage: The first PRV takes the very high inlet pressure (e.g., 400 PSI) and reduces it to an intermediate pressure (e.g., 250 PSI).
- Second Stage: This intermediate pressure then becomes the inlet for the second PRV, which performs the final reduction down to the desired zone pressure (e.g., 100 PSI).
By splitting the pressure drop across two valves, neither one is subjected to an excessive differential. This dramatically reduces wear and tear, eliminates cavitation, provides much quieter operation, and offers a level of redundancy. Adjusting such a system requires setting each valve in sequence, starting with the downstream valve first and then setting the upstream valve to deliver the correct intermediate pressure.
The Impact of Water Quality on PRV Longevity
A PRV's internal workings are a finely tuned mechanism. Its performance and lifespan are directly impacted by the quality of the water passing through it. Municipal water supplies are not pure H2O; they contain dissolved minerals, suspended solids like sand and silt, and treatment chemicals like chlorine.
- Sediment and Debris: As discussed in troubleshooting, solid particles are the enemy of a PRV. They can clog strainers, score piston walls, and prevent seats from sealing properly, leading to pressure creep. In areas with poor water quality, more frequent flushing of mains and cleaning of strainers is essential.
- Scale Formation: In regions with "hard" water (high in calcium and magnesium), mineral scale can build up on the internal surfaces of the valve, particularly on the diaphragm and spring. This scale can restrict movement, causing the valve to become sluggish or seize altogether.
- Corrosion: Aggressive water chemistry, with a low pH or high levels of chlorides, can corrode the metallic components of the valve. While valves are made from corrosion-resistant materials like bronze or stainless steel, even these can be compromised over decades of exposure.
This underscores the importance of a holistic view of the water system. The PRV does not exist in isolation; its health is tied to the health of the entire piping network.
Integrating PRVs with Other Fire System Components
A pressure reducing valve is a team player. Its function is intimately linked to the operation of other critical components in a fire protection system.
- Fire Pumps: The PRV is often placed on the discharge side of a fire pump to tame its powerful output. The pump provides the volume and high pressure, and the PRV refines that pressure for different zones. The pump's churn pressure, operating pressure, and the PRV's setting must all be coordinated.
- Check Valves: A check valve is a one-way valve that is essential for preventing backflow (dbaovalve.com). In a multi-zone system, PRVs and check valves work together to ensure that high pressure from one zone cannot flow backward into a lower-pressure zone.
- Alarm Valves and Flow Switches: The PRV is typically installed upstream of the main alarm valve for a sprinkler zone. The flow of water through the PRV, once it reaches a certain rate, will in turn cause the alarm valve to open or a flow switch to activate, which sends the signal to the fire alarm panel. The entire sequence, from PRV to alarm, must be tested and verified.
Understanding these relationships is key to diagnosing system-wide problems. A pressure issue in one zone might not be the fault of its PRV, but could be related to a pump problem or a failing check valve elsewhere in the system.
The Future of Pressure Management: Smart Valves and IoT
The field of fire protection is gradually embracing digital technology. The next evolution in pressure management lies with "smart valves" integrated with the Internet of Things (IoT). Instead of relying solely on manual, periodic testing, these advanced PRVs will feature:
- Integrated Sensors: Built-in electronic pressure sensors on the inlet and outlet, along with flow meters, can provide continuous, real-time data on the valve's performance.
- Remote Monitoring: This data can be transmitted wirelessly to a central building management system or a cloud platform. Facility managers can monitor the health of every PRV in their portfolio from a single dashboard, receiving instant alerts for issues like pressure creep or low pressure.
- Predictive Maintenance: By analyzing trends in the data over time, algorithms can predict when a valve is likely to fail before it actually happens. For example, a gradual increase in static pressure over several weeks could signal a developing seal problem, allowing for proactive maintenance instead of reactive repair.
- Automated Testing: Some emerging systems even allow for automated, partial flow tests to be run on a regular schedule without the need for a technician on-site, providing a constant verification of readiness.
While still not widespread, this technology promises to shift fire system maintenance from a calendar-based schedule to a condition-based, data-driven strategy, offering an unprecedented level of assurance and reliability.
Frequently Asked Questions (FAQ)
What is the main purpose of a pressure reducing valve in a fire sprinkler system?
Its primary purpose is to automatically reduce a high and potentially fluctuating inlet water pressure to a lower, stable, and predictable outlet pressure. This ensures that the water pressure in a specific zone of the fire sprinkler system is maintained within the safe and effective range determined by the system's engineering design, preventing damage to pipes and ensuring sprinklers operate correctly.
How do I know what pressure to set my PRV to?
You should never guess or estimate the pressure setting. The correct static and residual pressure settings are determined by the hydraulic calculations performed by the fire protection engineer who designed the system. This information must be obtained from the official system blueprints, plans, or hydraulic calculation data sheets for the building.
What's the difference between a PRV and a pressure relief valve?
A pressure reducing valve (PRV) is designed to control downstream pressure under both flow and no-flow conditions; it is a regulating valve. A pressure relief valve, by contrast, is a safety device that remains fully closed until the upstream pressure exceeds a set limit, at which point it pops open to vent the excess pressure and then closes again. A PRV controls normal operating pressure, while a relief valve protects against dangerous overpressure spikes.
Can I adjust a pressure reducing valve myself?
The adjustment, testing, and maintenance of fire protection equipment, including PRVs, should only be performed by a qualified and trained professional. This work requires specialized knowledge of fire protection systems, an understanding of standards like NFPA 25, and the proper tools, including calibrated gauges. Incorrect adjustment can render a life-safety system ineffective or unsafe.
Why is my downstream pressure slowly increasing?
This condition is called "pressure creep" and it indicates that the valve is not sealing completely tight when there is no water flow. The most common causes are a small piece of debris caught in the valve's seat, or a worn-out disc or diaphragm seal. It is a serious issue that requires the valve to be isolated and serviced.
How often should a PRV be tested?
According to the NFPA 25 standard, pressure reducing valves should be visually inspected quarterly. A full flow test to verify both static and residual pressures must be conducted annually. Some local jurisdictions may have more stringent requirements.
What does turning the adjusting bolt clockwise or counter-clockwise do?
For the vast majority of pressure reducing valves, turning the adjusting bolt clockwise compresses the internal spring, which increases the outlet pressure. Turning the bolt counter-clockwise relaxes the spring, which decreases the outlet pressure.
Conclusion
The pressure reducing valve, though often hidden away in a riser closet or mechanical room, embodies a profound principle of control and balance. Its proper function is a testament to the foresight of engineers and the diligence of technicians who understand that fire safety is a science of precision, not approximation. The process of how to adjust a pressure reducing valve is more than a sequence of mechanical steps; it is a methodical dialogue with a critical life-safety device. It demands preparation, patience, and a deep respect for the powerful forces being managed. From the initial safety checks and interpretation of design documents to the delicate, iterative dance of setting static pressure and verifying it with a dynamic flow test, each action builds upon the last to create a state of reliable readiness.
Ultimately, a correctly calibrated PRV ensures that when water is needed most, it arrives not as an uncontrollable torrent or a feeble trickle, but as a precisely delivered agent of suppression. By embracing a disciplined approach to maintenance, documentation, and troubleshooting, we uphold our fundamental responsibility to ensure that these silent guardians stand ever-ready to protect property and, most importantly, human life.
References
Best Flow Valve. (2025). Back pressure valves: Comprehensive guide for industrial applications (2025). Best Flow Valve. https://www.bestflowvalve.com/back-pressure-valves-comprehensive-guide.html
DBV Valve. (2022). Types of valves in fire fighting system. DBV Valve. https://dbaovalve.com/types-of-valves-in-fire-fighting-system/
Jianzhi Pipe Fittings. (2024). Why are fire pipe fittings important in fire safety systems? Jianzhi Pipe Fittings. https://www.jianzhipipefitting.com/2024/12/17/why-are-fire-pipe-fittings-important-in-fire-safety-systems/
Leyon Piping System. (2024). What valves are used in a fire fighting system? Leyon Piping System. https://leyonpipingsystem.com/what-valves-are-used-in-a-fire-fighting-system/
National Fire Protection Association. (2023). NFPA 25: Standard for the inspection, testing, and maintenance of water-based fire protection systems. NFPA.
Onerovalve. (2025). API 607 vs API 6FA: Understanding fire-safety standards for ball valves. Onerovalve. https://www.onerovalve.com/blog/comparison/api-607-vs-api-6fa/
Steelstrong. (2024). Exploring gate valve fire safe design and testing standards. Steelstrong. https://steelstrong.com/blogs/exploring-gate-valve-fire-safe-design-and-testing-standards/
THINKTANK. (2024). Safety valves. THINKTANK.